Make sure the system is adequately powered by using the right gauge twisted pair wire to connect all powered devices. Don’t violate Ohm’s Law, Baran cautions. That formula is:
E (or voltage) = I (current) x R (resistance).
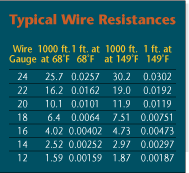
“E†is a fixed number – usually either 12 or 24 volts. “I,†which is calculated by adding up the current draw of all peripherals, is also fixed – and Baran advises installers to add a 20 percent safety margin. That means the only factor that an installer can control is “R†– or the resistance of the wire – which is determined by its length and gauge, Baran notes. Installers also may have little flexibility with the length of the wire. But what they can easily control is the wire gauge. (See “Typical Wire Resistances†table on this page, for help in selecting the right gauge wire.)
Select the right lens format for use with a particular camera model. “The lens format is based on the size of the image capture device,†Baran says. Today, these image capture devices are chips that usually measure 1/2-inch, 1/3-inch, or 1/4-inch. Check the camera’s spec sheet and be sure to purchase a lens designed to work with that type of chip. “A mismatched lens can make it look like you’re looking down a tube,†Baran cautions.
Select the right focal length lens to give the client the desired view. “If you want to identify the object, then you probably need a lens that will allow a more telephoto range, such as a 5-50mm lens, rather than a 3-8mm lens,†notes Steve Beaulieu, national sales manager for Tamron USA Inc., Commack, N.Y. “If you only want to see activity in a wide area, you can use a 3-8 mm lens and cover more than 90 degrees. But you must remember that you will not be able to identify an object beyond 20 or 30 feet.â€
Consider using an aspherical lens when installing a camera in a brightly-lit area, advises Cynthia Freschi, president of North American Video, a systems integrator headquartered in Brick, N.J. Such lenses diffuse the light so that the video images do not appear washed out, Freschi notes.
Before installing a color camera, ensure that the digital video recorder (DVR) to which it will be attached can accept a color input, Freschi adds. Most can, she notes, but when retrofitting an existing installation, this can sometimes be an issue. Even when an image appears in color on the monitor, the recorded images could still be black and white if the DVR can’t handle color.
Be sure to change the DIP switches that are commonly found on pan/tilt/zoom cameras, advises Don Taylor, vice president of marketing for Dedicated Micros Inc., Chantilly, Va. Typically these DIP switches are set to Camera 1 as a default and must be changed to match whatever has been programmed into the DVR.
Consult with the client to determine the optimum combination of storage capacity and frames per second to be recorded. “It’s a balancing act,†Baran says. “Get feedback from the client about what’s really important.†To ensure capturing an image of a moving subject, you will likely need to record at least 7 frames per second. To minimize storage requirements, consider programming the system so that the frames per second recorded are increased when motion is detected – or consider using a DVR that enables different cameras to record at different frame rates. Image resolution also has a big impact on storage requirements. A low-resolution image may consume 5 kilobits of storage space, while a high-resolution image may consume 40 kilobits, Baran notes.
When connecting a video system to an Ethernet network, be sure not to use Category 5 wire runs longer than 300 feet from any device to the nearest Ethernet hub. Use fiber for any runs that must exceed 300 feet.
When connecting a DVR directly to a computer using the Ethernet port (as when programming the DVR), use a crossover cable – not a patch cable. Although both cables look similar and have the same types of connectors on each end, the patch cable is designed to connect to network devices, such as hubs, and will not work in this situation. To avoid confusion, purchase crossover cables in red so they can be identified easily.
Before running a camera and fiber module from the same power supply, be sure they have compatible power systems, advises Fred Kelmer, an engineer for Infinova, Monmouth Junction, N.J. Both devices must use the same type of rectification – full-wave or half-wave – and polarity should be observed. “Fiber products have thermal fuses,†Kelmer notes. “These open, then close. But they give up after a couple hundred cycles.†That can cause a short that can actually cause one of the devices to go up in smoke, Kelmer says.
When programming a DVR or matrix system, be sure to back up the system configuration to a disk or flash memory. This can facilitate reprogramming the system if settings ever should be erased.
Never discuss reset and back door codes for matrix systems with security personnel, advises Hayley Herrmann, brand marketing manager for Tyco. Armed with such information, “a disgruntled employee can render a system useless within seconds,†Herrmann notes. (See sidebar for additional matrix system installation tips.)

How to Ensure a Dependable Matrix Installation
- Cable management is paramount. Use labels and/or color-coded wire. Document everything.- Think expansion. Plan ahead for system growth to prevent overgrown equipment rooms that have heat/space problems.
- Have properly trained personnel configure/program matrix switchers, as they tend be complicated in terms of alarms, macros, multi-protocol devices, etc.
- A good rule of thumb is to have a keyboard/monitor video source in the equipment room as a permanent troubleshooting tool. This way you will not disturb security personnel.
- Back up system configuration to disk and keep in a readily available location.
- Use an oscilloscope with TV triggering to check video levels. Many installations have open, shorted, unterminated or double-terminated, or distorted video signals.
Source: Tyco