Tools and Techniques
When commencing a fiber optic cable installation, two key issues require careful attention. The first is to be absolutely certain that the fiber cable is the proper length to reach from the starting point to the ending point, with a minimum of 30 ft. of excess (slack) cable at both ends. If the cable is found to be too short during installation, either a splicing point must be added, with extra cable connected to reach the end point, or the cable must be replaced with one of the proper length. These difficulties will be avoided if the pulling distance between the two points is measured carefully. It is always better to have more cable than necessary, as there may be unseen or unplanned detours in the planned cable path.
The second key issue is the method used for connecting the pulling string to the fiber cable. At no time should the pulling string be connected directly to the fiber strands. Pulling the cable by the fibers themselves will cause multiple fractures of the fibers, making them unusable.
Damage to the fiber also will occur if the pulling string is tied to the outside plastic jacket. This jacket will stretch when pulled, and snap back to its original length when tension is removed, which can cause multiple breaks in the fiber strand.
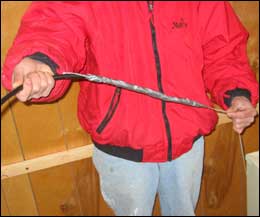
Fiber cables contain an aramid yarn material under the jacket, which is provided for connection to the pulling string. Also called Kevlar, this is the same material used in bulletproof vests and military helmets. Because this yarn does not stretch, the accompanying fiber strands are not damaged when the cable is pulled by the yarn.
PULLING THE CABLE
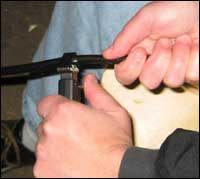
To prepare a fiber cable for pulling, start by removing 2 ft. of jacket material, using a ring tool or electrical stripper, based on the diameter of the cable. It is very important to remove the jacket carefully, in small sections, so that minimum tension is needed to pull off the outer jacket. It is best to sever the jacket material with the tool, and use your hands to gently remove the jacket material. Be cautious with any tool used to cut the cable jacket, so that the sharp edge of the tool does not come into contact with the fiber strands. Any small nick on a fiber will cause high optical loss, and/or will break during installation.When 2 ft. of the yarn is exposed, cut off cleanly the excess fiber strands, tie the pulling string to the yarn, and wrap with tape.
Fiber cable has very high pull strength, and can be pulled with great force when using the yarn as the pulling medium. Most fiber cables are rated for 100 lb. or more of pulling strength.

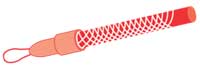
When pulling large-diameter cables, such as between buildings, often the installing company will use a special pulling apparatus called a Kellum’s grip. The mesh steel end of the grip grabs the entire cable end and provides a hook or loop for connection to the pulling string or wire.
Looking for quick answers on security topics? Try Ask SDM, our new smart AI search tool. Ask SDM →
Once the pulling is completed, be certain that a minimum of 30 ft. of excess cable is provided at both ends.
CABLE END PREPARATION
Fiber strands are protected by multiple layers of jacketing and yarn, which must be removed carefully before installing connectors or splices. Fiber-specific tools must be used to perform this task properly, or damage to the fiber strand most likely will occur.
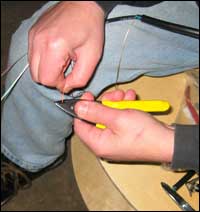
Step 1: Remove Outer Jacket. The first step to end preparation is to remove the outer jacket. When installing zip cord cable, which has a single fiber strand underneath a yarn wrap and plastic jacket, the Clauss CFS-2 is a good tool to use. The larger hole in the dual-use jaws is used to cut the jacket material, which is then removed using fingers. Many electrical multi-tools also have cutting holes of sufficient size to cut the outer jacket without harming the fiber contained within. Do not cut into the outer jacket and pull with the stripping tool; this will damage the fiber. Cut or score the outer jacket, put the tool aside, and use your fingers to gently remove the jacketing material. The outer jacket should be removed in 4- to 6-in. increments, until the desired length of fiber strand is exposed.
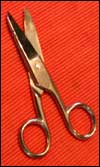
Step 2: Cut the Kevlar. Once the outer jacket is removed, it is often necessary to cut the aramid yarn, either to remove it completely or to leave a small amount exposed for connector installation. Although this yarn can be cut with a sharp knife, it is best to use Kevlar shears, such as the Clauss 925C. This tool will cut the yarn easily without undue stress. Twirling the yarn into a tight bundle before cutting helps make a clean and easy cut.
Step 3: Strip for Connectors and Splicing. To make a fiber strand ready for termination into a connector or splice, the 900-micron jacket and the 250-micron buffer plastic coating must be removed carefully from the fiber. While the 900-micron jacket is easily visible, the buffer coating is clear and directly adheres to the fiber cladding itself.
Different brands of strippers need specific handling techniques to properly strip the fiber without breakage. For example, when using the Clauss CFS-2 to strip 900-micron jacketed fiber strands, a right-handed technician would angle the tool at 45 degrees, with the knuckles out, for proper cutting. If left-handed, the knuckles are curled under, again providing a 45-degree angle to the fiber.
Regardless of the manufacturer, there are three rules to follow when stripping fiber. First, the stripper must be very clean, as even a tiny bit of debris in the jaws of the tool will cause the fiber to break off, as the precision hole in a closed stripper cannot fit the fiber strand and the debris at the same instant.
Second, strip only approximately 1/2-in. of jacket material at a time, as the process of pulling the jacket material from the fiber strand stresses the fiber. Longer stripping lengths often will result in breakage.
Third, close the stripping tool firmly. Novice fiber technicians often will close the tool softly, thinking that the fragile glass fiber will be broken if too much force is applied. If the tool is not firmly closed, the cutting indents will not penetrate the buffer coating completely, and the fiber will break when the stripper is moved. If you find that you are constantly breaking the fiber, then try closing the stripper tighter.
SAFETY FIRST
When preparing fiber cables for termination, it is imperative that technicians protect themselves and others from the small glass shards that may be broken off during the process. Always wear safety glasses, point the fiber away from the face or body when stripping, and pick up and discard broken fiber pieces into a screw-top jar or other receptacle. Do not leave broken fiber pieces in the work area, as other workers may inadvertently be hurt by the sharp glass.Fiber preparation is a learned skill, like driving a vehicle. Technicians should practice on a spare length of fiber cable before attempting fieldwork. Different cable manufacturers use various compounds for jacketing material, and some are much easier to remove than others. By practicing before the installation, technicians may familiarize themselves with the nuances of their tools and the fiber cable itself.
Looking for a reprint of this article?
From high-res PDFs to custom plaques, order your copy today!