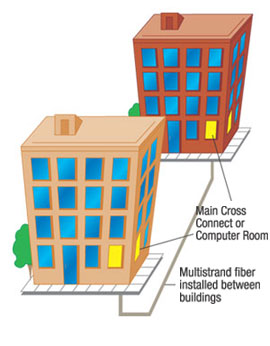
A very efficient way to satisfy the client in this type of situation is to use fiber optic links that are already in place in the client’s data and/or telephone cabling system. Most organizations’ computer rooms are connected together with some type of fiber optic cabling. Usually, when a data/voice cabling system is planned, extra fiber optic strands are installed to allow for future expansion. These “dark†fibers may be perfect for your video surveillance or access control application. By using existing fiber optic strands, you can save your customer the costs and disruptions of installing new outdoor cables, and deliver a more competitive price for your system. You also can substantially extend the distances between cameras and monitors.
Getting Comfortable
Many security dealers are leery of fiber optics because of a lack of knowledge, yet the knowledge required can be easily obtained. Let’s walk through some fiber optic basics, and then let’s look at a sample installation to see how to use an existing fiber optic cable.Fiber optic strands are specially manufactured pieces of glass, which act as a waveguide to carry light signals from one end to the other. Think of them as a conduit for the light signals, which can be either LEDs or lasers.
Fiber optic strands typically are available in two different sizes. Multi-mode fiber has a core diameter of 62.5 microns, and uses LED light sources. Single-mode fiber has a much smaller core size, usually 8-9 microns in diameter, and uses laser lights for the signal. When stripped, both of these fibers have an outer diameter of 125 microns, which is the diameter of the cladding or outer glass wrapping and the fiber core combined. This fiber is slightly thicker than a human hair.
One of the great advantages of fiber optics is that the signals can travel a great distance. It is not unusual for a fiber optic signal to travel more that 60 miles before it has to be regenerated or amplified.
A fiber optic link is a length of fiber optic glass with a connector installed on each end. Most connectors used today are either the ST (round body) or SC (square body), and are made by a variety of manufacturers. Each fiber link goes from A to B; there are no branch circuits or T-tapping in fiber optics.
Connectors are used so that various transmitter and receiver devices, called optoelectronics, can be easily connected and disconnected to the fiber optic link. Optoelectronic transmitters convert electrical digital or analog signals into light pulses, which are sent through the fiber link to the receiver, which converts the light pulses back into electrical digital or analog signals.

A campus-type facility may have unused, or dark, fiber optic strands already installed between buildings. Check out this cable for possible installation of your clients’ video surveillance or access control systems.
Installation Preliminaries
Let’s take a look at our proposed system. If we are going to install four cameras in one building and monitor them in another, the first step is to check with the computer system manager, and find out if there are any dark fiber strands that we can use. If there are, the next step is to inspect the fiber, and determine if it can be used for our video surveillance system.When inspecting the proposed fiber, these are the things you should look for:
• Type of fiber – multi-mode or single-mode,
• Length of fiber link from one building to the other, and
• Quality of fiber – Will your signal get from one end to the other?
The type of fiber and the length both can be determined by the markings on the outer jacket of the fiber cable. The fiber’s core size will be clearly indicated, as will be numbers called “foot markers,†which are stamped on the outside jacket every couple of feet. By subtracting the value at one end of the fiber from the value at the other end, you will know the overall length of the fiber in question. Remember that not all cables are installed in straight lines. It is possible that the fiber length between computer rooms in our two buildings may be substantially longer than a straight line measurement.
The quality of the fiber has very little to do with who made the cable, and everything to do with the skills of the installation company. Fiber link quality can be compromised by poor installation, excessive bending of the cable, and poor connector practices. A simple test to determine the quality of the installation is to use a standard flashlight and shine the light into one end of the link. If the light is visible at the other end, the fiber strand has not been broken in the process of installation, and the fiber is usable for our purposes. If the light doesn’t appear, the fiber is broken, probably at one of the connector ends. Ask the client if there is another fiber that you can test for use. A typical flashlight will travel approximately two kilometers (1.2 miles) in a fiber link, and still be visible at the other end.
If available, a loss meter test set, which includes a dB light meter and separate light source, can be used to check the quality of the fiber link being tested. By connecting the light source to one end of the link, and the power meter to the other end, a negative number will appear on the meter, indicating the amount of light signal loss from one end to the other. This number will be expressed in dBs. The greater the loss, the larger the negative number. Most video surveillance and access control optoelectronic sets can handle up to -10dB of loss on the fiber link and still function well. Loss meters can be purchased from a variety of companies, or can be rented from some distributors on a daily basis.
Once we’ve determined that the fiber link is usable, we can now investigate the optoelectronics to find the right devices to mate our camera system to the fiber. When looking at a vendor’s products, we need to learn the following:
• Will the devices carry the signals that we need?
• What type (multi-mode or single-mode) of fiber does the device set require?
• How many fibers are necessary to carry the signals?
• What is the maximum distance that the devices will operate?
• What is the maximum loss that the devices can handle and still function?
• What type of connectors does the device require?
Manufacturers make a wide variety of devices for these applications. Let’s consider a system where we want to install four cameras in one building, hook them to an existing multi-mode fiber optic link that is 1,000 feet long, and monitor the cameras at the other end.
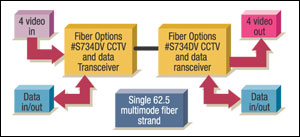
Confirming the first bulleted item, above, is simply a matter of consulting with a manufacturer or distributor, and having the specification sheets for the product sent to you. We need to check that the device will carry the number of video and control signals we need to make our system work. Some companies make devices that use a single fiber bi-directionally, so that the video signals flow to the monitoring equipment, and the pan/tilt/zoom control signals go back to the camera end.
We have already determined the type of fiber during our on-site inspection. For this example we will be using a multi-mode (62.5 micron core) fiber. If you have a choice between using a multi-mode or a single-mode fiber, you should select the multi-mode in most cases. The LED light sources used in multi-mode are much less expensive than the laser light sources used for single-mode, making the multi-mode optoelectronic device sets less expensive than the laser device sets. You would choose to use the single-mode fiber if the length of the fiber link is longer than four miles.
Devices carry more than one signal in one direction by multiplexing the signals together. Multiplexing makes it possible to have up to eight video signals carried by a single fiber strand. Multiplexing adds cost to the optoelectronic devices, so you may want to see if you can use multiple fiber links to get your signals from one building to another.
The maximum distance that the optoelectronic devices will function is a matter of the power of the light source output, and the sensitivity of the receiving equipment. Most devices built for these purposes will function to about a four-mile distance of the fiber optic link. Remember that you will be installing coaxial cable from the fiber connections to the cameras, a distance that can be in the range of 900 feet without amplification.
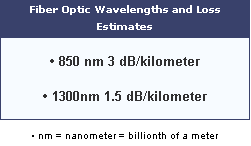
The specifications for the maximum amount of loss at which the optoelectronic device set can still function is sometimes called “maximum attenuation,†or the “optical budget.†Usually the maximum loss for a device set will be in the range of -10dB. Based on the wavelength of light being used by the devices, and the length of the fiber optic strand under consideration, we can calculate how much loss there should be in our link at that wavelength.

If our maximum attenuation is -10 dB, and our expected loss is -1.65 dB, our system should function perfectly well.
The connector type will be described on the manufacturer’s specifications, and will usually be either the ST or SC type for multi-mode fiber.

This simple schematic illustrates how the optoelectronic devices function in the system.
Ready to Install
After we have found a usable fiber link, and determined what optoelectronic set will best suit our needs, we are ready to install this system. The cameras, controls, and coaxial part of the system should be straightforward. We need to concern ourselves with a few items regarding the fiber optic portion.First, plan for mounting the optoelectronic devices very near to the connector ends of the fiber optic link being used, within 15 feet or so. This way our coax cables will be connected to the active devices somewhere in the computer room, or main cross connect room, where the fibers are terminated. Power will be needed for the optoelectronics, and you will need to plan for backup power if required. Jumpers of the proper fiber type, length, and connector end type can be purchased from various outlets. You will need these jumpers at each end of the fiber link to connect the optoelectronic devices.
Once the cameras are installed, and the coax cables are connected to the optoelectronic devices, the connection to the fiber link is established and the system should be up and running. Most optoelectronic devices are plug and play.
Troubleshooting Fiber Links
If the fiber link displays excessive loss when tested, or your system doesn’t function properly, then there are two probable areas to investigate. If the fiber link passes the flashlight test, then the fiber is not broken, and you should be able to make it function.First, any dust or dirt on the fiber connector ends may cause excessive loss. Be sure to clean the ends of the connectors with alcohol-impregnated wipes, and also clean the connector end that you are plugging into. If cleaning the connectors doesn’t make your system functional, then one or both of the connector ends on the link may have been poorly installed. Examination with a connector microscope will reveal any cracks, pits, or other problems with a connector. The core of the fiber in the connector should be featureless, showing no abnormalities. In the old days, replacement of a connector was a long, frustrating process, with epoxy glues, various polishing cloths, and many steps to completion. Now manufacturers provide connectors that require no glues, no polishing, and can be installed in a couple of minutes. With good connectors in place, your system should be working.
By utilizing the otherwise unused “dark†fiber strand, we’ve provided our customers with the system that they wanted, at a price substantially lower than if we had trenched or run new overhead cable to carry the signals. Using fiber optics for security systems greatly extends the distances that we can send signals, and can be easily accomplished if we carefully investigate the fiber strand, optoelectronics, and installation.
Sidebar: At Risk: Your Safety
To safely install and test fiber optic links, technicians must pay careful attention to two issues that can be dangerous to the uninformed.Light sources used by fiber optic transmitters are invisible to the human eye, as they function at wavelengths above those that your eyes can see. These light sources can be lasers, which will cause damage to your eyesight with repeated exposures.
Extra care must be taken to protect your eyes when working with fiber optic links. When working on a fiber link, the first rule is to ensure that there is no transmitter of any type connected to the other end of the fiber that you are inspecting. Just as we should treat all guns as loaded, you should always assume that there is a transmitter functioning on the opposite end of the fiber until proven otherwise.

A simple flashlight test, although not approved, can help technicians easily determine if an existing fiber optic cable has been installed correctly and is usable.
To determine how your power meter indicates “no optical power,†turn on the meter and completely block the input connection with a business card or paper. (Using your finger will leave oils on the receiver.) If your meter shows no power input at 850nm, 1310nm, and 1550nm, the fiber end is safe to view, as there is no light present in the fiber.
If a meter isn’t available, another test method is to use Infrared Detection Cards, which are available from Fiber Instrument Sales (telephone (800)500-0347). These laminated business-sized cards have a photodetection patch, which is activated by room lighting. Holding one of these cards at an angle to a connector will show if optical light is present. If neither of these methods is available, confirm that the fiber is not connected to a transmitter by inspecting the other end.
Fiber optic inspection scopes and safety glasses can be purchased with laser filtering built in, but the best safety practice is confirming that the fiber link being tested is disconnected from any light source.
Another safety concern in handling fiber optics is the pieces of fiber that are broken off during stripping and cleaving operations. Sharp as a needle, these fiber bits can easily penetrate your fingers, hands, and forearms. Of particular concern is the possibility of getting a fiber shard in your eye. Follow safe handling procedures, wear eye protection, and dispose of fiber pieces promptly in a proper fiber disposal canister.


