A Guided Tour of Wi-Fi Routers
There are many programming options available in networking devices such as routers and switches. This installment of Security NetWorkings takes us on a tour of a typical Wi-Fi router, such as one that might be used in a small business or office.
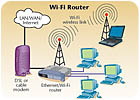
Although commonly called a router, the type of device described on these pages is more properly termed an Ethernet/Wi-Fi gateway switch. The particular device described here is a Dlink #614+, which is a popular brand of these products. This device allows the connection of up to four wired Ethernet nodes (computers, IP cameras, etc), plus Wi-Fi capable computers and devices, as well as an Internet connection, such as a DSL adapter or cable modem.

Accessing the Device from a PC
Let’s assume that the device is currently configured, connected and functioning properly. To access the router’s programming, open an Internet browser such as Internet Explorer, and type in the router’s LAN IP address. If the address is correct, this window will appear:
Typing in the correct user name and password will allow the user access to all programming functions.
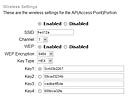
The first selection from the top is whether the Wi-Fi network is “Enabled†or “Disabled.†This feature can be used to quickly turn the wireless network on or off, without having to completely re-input all settings. This can be useful in circumstances where a network operator may only want the Wi-Fi to be enabled on command.
The next selection is the “SSID,†which is the name for the particular Wi-Fi network, in this case “fred12a.†This name is part of the association between the Wi-Fi router and the wireless computers or nodes that are connected. Wi-Fi routers can be programmed to broadcast this SSID name, telling Wi-Fi equipped computers what name to use for connection. Most routers can be programmed to disable this broadcasting feature, which enhances network security. Computers (or Wi-Fi cameras) can either receive the SSID through the broadcast, or have the SSID name programmed into them manually. SSID names always should be changed from the default, which is usually the manufacturer’s name or the part number of the router.
Below the SSID name is a selection to enable or disable WEP, which stands for Wired Equivalent Privacy. This is the encryption algorithm available in standard Wi-Fi products, which converts transmitted data packets into strings of unintelligible bits that can only be properly used if the receiving computer or router is programmed for the same WEP key, which decrypts the data packets.
The WEP key being used will be common to all connected computers at a given time. The WEP key must be manually input into Wi-Fi computers and cameras before they can communicate with the router and other computers on the network.
Security technicians note: Different products from different vendors use different methods of entering WEP encryption keys. In some cases, certain Wi-Fi network cameras will not allow the setting of their WEP codes in the same way as a particular access point or router. Also, remember that WEP encryption will slow down data transmissions, which will reduce frame rates from Wi-Fi cameras. It’s a good practice to first program a Wi-Fi camera and router “in the clear,†without WEP enabled in the router/access point or camera. After communications are established, then the related devices can be programmed for WEP functions.
Looking for quick answers on security topics? Try Ask SDM, our new smart AI search tool. Ask SDM →
WAN Settings
The “WAN†settings are where the router is programmed for how it will be addressed by the Internet adapter, such as a DSL or cable modem connection. The two most typical selections will be either “Dynamic IP†or “Static IP.†Low-cost DSL and cable connections use Dynamic, which provides a temporary leased Internet IP address from the ISP for the router and network.PPPoE stands for Point to Point Protocol over Ethernet, and may possibly be needed for some DSL and cable modem connections. If PPPoE is selected, the router software will ask for a user name and password, which it will then transmit upon request by the ISP’s network.
Security technicians note: How do you know if the client’s ISP requires PPPoE? Open an Internet browser, and type in a valid Web address. If a password screen opens every time the Internet is accessed, the ISP is using PPPoE verification. If PPPoE is required, get the user name and password from the ISP.
Host Name
Computers on a network can have common names as well as IP addresses. It’s easier to remember “Dave’s PC†than an IP address such as 192.168.2.15. Generally this setting can be left at the default.The Media Access Control (MAC) address on this screen is the WAN MAC, providing a unique equipment identifying code to the network. This code should not be changed by the user, except as detailed below.
Connection of a wired or Wi-Fi router to a broadband Internet connection allows many users to receive Internet services from a single DSL, cable modem or other ISP connection. Put in a Wi-Fi router, and one broadband connection can cover a whole building, or a cluster of homes. This potentially can cut into the ISP’s revenues, as one connection is serving many users.
While some ISPs don’t care about connection sharing, some try to limit it in the following way. The ISP specifies that only single PCs may be connected to its adapters. When the DSL or cable modem is initially installed, the network will pick up the MAC address of that single computer and associate it with that particular connection. If another device, such as a Wi-Fi router, is connected to the adapter in front of the previously connected computer, the ISP network will refuse the connection, as the MAC of the router is different from the previously registered MAC of the PC.
Most common routers offer MAC cloning to defeat this constrictive technology.
LAN settings
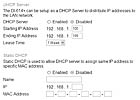
This screen shows the local area network (LAN) address that the router will present to other computers, wired or Wi-Fi, within the local network. Generally, it’s a good idea to leave this at its default value, which will usually be either 192.168.1.1 or 192.168.2.1. If the LAN address of the router is changed from its default class C network address, it may be impossible to set the NAT for cameras or other devices that must be viewed from outside the local network.DHCP Settings
Even inexpensive routers have powerful network features. The screen provides the settings for Dynamic Host Configuration Protocol (DHCP), which instructs the router to provide Dynamic LAN IP addresses to computers and devices on the local network. This is a commonly used technology, as occasional network users don’t have to be given a specific LAN IP address for input into their laptop. Visiting users just program their computer to accept a DHCP address from the router, and they’re connected.The first selection simply enables or disables the DHCP function. The “Starting†and “Ending†IP Address selections allow system operator control of just how many computers can be connected using DHCP at a single time. This can be used to provide another level of network security. The “Lease Time†is the time frame that a DHCP address is valid.
Another level of security can be achieved by using “static DHCP.†This setting tells the router to only issue DHCP addresses to computers with specific MAC addresses. A business can enter the MACs of the laptops of regular visiting users, such as upper management or salespeople, and they will be allowed onto the network, while non-registered laptops will be denied access. This is sometimes called MAC authentication.
Routers control the what, when, and where to of network communications, linking LAN devices such as computers and IP cameras to each other and the Internet. As such, understanding the control options of routers is an important component of IP-enabled security device installation. Routers also provide valuable firewall and network security features; it is the responsibility of the network administrator and/or electronic security company to properly enable them.
Side bar:
Danger Zone
Randomly changing router options in an effort to enable communications to IP security devices over the LAN or Internet will cause great frustration for alarm technicians, and may also disable enterprise data communications functions for the client, which is a particularly distasteful turn of events. Trust the author on this issue; been there, blew it up. Luckily, it was my own network, so the damage and embarrassment were contained.
Here are some rules for working with a router, especially one that is also providing connectivity for the homeowner’s or business’ computer network.
1. After opening the router’s programming screens, PRINT OUT each relevant page BEFORE MAKING ANY CHANGES. If things go horribly wrong, at least you can reset the client’s router back to its original state, restoring communications.
2. Make any changes one at a time. After the change is complete, reset the router and try the communications that were not working previously. If it doesn’t work, try another setting. Don’t make two or more changes at the same time, as they may have a cascading effect on each other, and you likely won’t remember what to undo in the heat of the installation.
3. Understand what you are changing. If you don’t understand it, DON’T TOUCH IT. There are many esoteric options in routers that generally will not affect the communications of IP cameras and security devices. The fewer changes, the better.
4. Resetting the power on routers and IP network devices after programming changes will occasionally make things happen the way you’d like.
5. FACTORY DEFAULT WARNING – Resetting the factory defaults will most likely kill the client’s computer network, garnering the alarm technician ugly looks and heated words. And the technician will have to reprogram the entire network’s LAN IP address table, DHCP settings, etc. DO NOT RESET THE ROUTER’S DEFAULTS.
6. READ #1 AGAIN. This is absolutely critical.
Looking for a reprint of this article?
From high-res PDFs to custom plaques, order your copy today!


