How to Install Connectors
The fiber optic connector provides a method for technicians and end users to easily connect and disconnect an optical fiber link, without the use of any special tools. The fiber ends in the connector are finely polished, with two connectors held together within an adapter or barrel to align the two fiber ends.
The quality of an individual connector cannot be measured in the field, as it is impossible to determine how well a single connector passes light without inserting it into an adapter, and inserting another connector that receives the light energy. The fiber industry often refers to two connectors with their adapter as a connector set or pair. Connectors are tested by measuring the optical loss of a pair of connectors and their mating adapter.
TYPICAL CONNECTOR STYLES
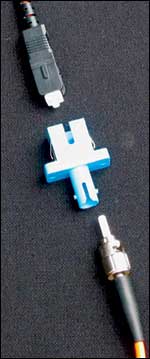
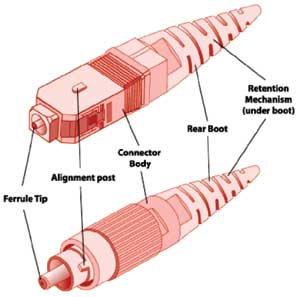
Although the function of a connector hasn’t changed, a variety of different body styles have been used over the 20 years of active fiber optic installations. A security technician most often will encounter the two most popular types of connectors – the ST and the SC.The ST connector is the most popular fiber connector for both singlemode and multimode fiber, comprising approximately 90 percent of all connectors installed. The ST has a round body, an alignment post, and a 2.5mm ferrule, which is the end of the connector that mates into the adapter. These connectors are inserted by aligning the post with the slot in the adapter; pushing the connector in, and twisting clockwise one-quarter turn until the connector locks in place. A spring within the connector body holds the connector firmly in place. Because of this connection movement, ST connectors are sometimes referred to as stick and twist, hence, the ST designation. Most security industry-specific transmission devices will be supplied with ST connections as standard.
SC connectors have a square body, an alignment post, and a 2.5mm ferrule. SCs are popular in computer networking and telephony, and comprise approximately 90 percent of the 10 percent of the connector population that isn’t the ST type. These connectors are inserted by aligning the post with the adapter slot, and pushing the connector in until it clicks. SC connectors are called stick and click in reference to their insertion movement.
As both connector types have a 2.5mm ferrule, they can be mated together using hybrid adapters, which are readily available from fiber optic supply houses.
There are many different manufacturers of these two types of connectors. It is important to note that connectors from different vendors are interoperable with those from another vendor, provided that the type of fiber (multimode or singlemode) is the same and the connectors were installed properly.
There are three common methods for installing connectors, and any of these methods can be used to achieve high-quality, low-loss connector sets. These three methods are glue and polish, cleave and crimp, and fusion splicing pigtails. When choosing an installation method, the installation company should consider costs for tools, time required to perform connections, and the level of technician training necessary. Well-trained technicians can install connectors with consistency and a high yield of good-quality connectors.
Looking for quick answers on security topics? Try Ask SDM, our new smart AI search tool. Ask SDM →
Glue and polish is the most common method of connector installation. It is also the slowest and requires the most training and care by the technician to achieve consistently good connectors. After stripping the buffer coating and the 900-micron plastic jacket from the fiber end, epoxy glue is injected into the body of the connector so that a small amount flows out of the ferrule end. The fiber is inserted into the connector body, and this assembly is placed into an oven, which heats the connector, setting the epoxy glue. After 15 min. in the oven, the connector is removed for cooling. Once the connector is cool enough to handle, a jewel-tipped tool called a scribe is used to gently scratch the excess fiber sticking out of the ferrule. After scribing, the fiber stub is removed with fingers, and the fiber is gently polished, using two or three steps of successively finer polishing papers, a polishing puck, and a flat surface.
The cleave-and-crimp connection method is gaining in popularity, particularly among security technicians, where small numbers of connectors are usually installed. These connectors have a pre-polished fiber stub installed in the ferrule. These have been assembled at the factory, and have a quality of polish superior to any that can be performed in the field. The technician strips the jacket and buffer coating from the fiber, and uses a special tool called a cleaver to break off the fiber to within two degrees of 90 degrees (perpendicular), at a specific length. The pre-installed fiber stub in the connector has been cleaved at the factory. The cleaved fiber end is inserted into the back of the connector until it contacts the fiber stub within. An internal mechanical clamp is activated, which holds the two cleaved fiber ends together, and a crimping tool is used to crimp the back of the connector to the fiber’s jacket.
The quality of the cleave is very important, because a mediocre or poor cleave will become a poor or inoperative connector. Each cleave should be inspected with a side-view 100-power microscope before insertion into the connector body. There are a number of vendors of cleave-and-crimp connectors, and they also supply complete tool kits for connector installation. Contractors should verify that the connection kit includes a side-view scope; some vendors do not include this critical item in their standard tool kits.
FUSION SPLICING PIGTAILS
This is the fastest method of connector installation, and yields the highest-quality connectors. Fiber-optic jumper cables with the appropriate type of connectors installed, ST or SC, are purchased from a fiber optic supply house. Because these connectors have been machine-polished, they are very high quality and low loss.At the installation site, the jumper cable is cut in the center, producing two short fiber cables with connectors attached, called pigtails. After stripping the fiber to be connected and the pigtail, the fibers are cleaved and welded together with a fusion splicer. This is a fiber-specific device that precisely aligns the cleaved fiber ends, passes an electrical arc of specific time duration across the fiber ends, and pushes them together.
This entire operation can be performed in minutes, and produces the highest quality connector installation. However, the high cost (several thousand dollars) of a new fusion splicer usually precludes most security installation firms from using this method. Fusion splicers may be rented for a few days, and there is a large quantity of fusion splicers available on the secondary market, at greatly reduced costs.
If performing singlemode installations, particularly for telecommunications or cable television systems, this method of connector installation is usually required.
Fiber optics is an exact discipline, and requires complete knowledge and training for the technician to properly and safely perform connector installation. Many labor-hours have been wasted by unknowledgeable technicians not understanding the correct tools, methods, and hand skills needed for fiber optic work.
Fiber connectors are simple devices that allow fiber links to be readily connected and disconnected. Proper attention to tools, techniques, and hand skills will allow the technician to regularly produce high-quality, low-loss connector sets. After the connectors are completed, remember to always clean the ferrule ends when testing or connecting fiber optic devices.
Sidebar: Fiber Optic Connector Tool Kits, Testing & Cleaning
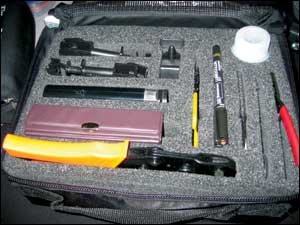
TOOL SETSThere are several suppliers of fiber optic connector installation kits. If glue-and-polish connectors are chosen, there are a number of generic tool kits that will provide the specific tools and consumables needed for proper connector installation. These tool kits can be used with connectors from a number of different manufacturers.
Cleave-and-crimp connectors are specific to their vendor’s tool set. For example, when installing AMP Crimplight connectors, an AMP tool kit will be needed.
Most connector kits include the tools and equipment to install both ST and SC types of connectors, so one tool kit is often all that is required to perform either type of installation.
It is important that fiber-specific tools be used for connector installation. Only fiber optic tools will perform the task properly – standard electrical tools most likely will destroy the fiber end or connector.
TESTING, TRAINING, CLEANING
Once the connectors have been installed, the completed fiber link should be tested. A simple “no-go†test can be performed with a flashlight. By placing the connector ferrule against a lit flashlight, the light will appear at the other end, provided that the fiber hasn’t been broken during the connector or cable installation. For electronic security installations, this may be all the testing that is necessary. After using the flashlight, connect and power the transmitter and receiver. If the system is functional, the fiber link is of adequate quality.
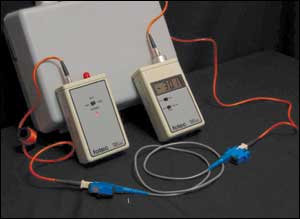
A more thorough test is performed using an optical loss meter set, which includes a light source and an optical power meter. This test will provide a measurement of the optical loss of the tested fiber link, indicated in -dBs. Expected optical loss in a fiber optic link is a function of the length of the fiber, number of connector sets, and any mid-span splices – and is easily calculated. If the optical loss test indicates excessive loss, most likely one of the connectors is of poor quality, or the fiber is pinched or bent excessively within the connector enclosure or rack.
How to Clean a Ferrule
Cleanliness of the ferrule face is absolutely critical to proper performance of a connector. Even a very small speck of dust can cause the two fiber ends to be held apart within the adapter, dramatically increasing signal loss. Every connector should be cleaned every single time it is to be inserted into an adapter.
While there are a variety of fiber-specific connector face cleaning methods, tapping the ferrule onto the sticky side of common cellophane tape is an inexpensive and complete way to clean connectors.
Looking for a reprint of this article?
From high-res PDFs to custom plaques, order your copy today!