FIELD GUIDE TO DVRS: Expert Tips: On DVR installation

Replacing VHS Recorders with DVRs
One of the most common situations where DVRs are deployed is when an existing CCTV system is being upgraded to use digital image storage, either because the VHS tape-based recorder has become troublesome, or the client has decided to switch to digital storage for its numerous benefits.Here are some typical questions that might arise when planning and installing a DVR for an existing CCTV installation:
How should I calculate my client’s video storage needs?
Video storage requirements are developed by considering the number of cameras to be recorded, the desired picture quality, frames per second to be stored for review, and the number of days of video storage desired by the client. It’s important to figure the video storage requirements carefully, as the amount of storage needed will dictate the size and number of hard drives that need to be included or connected to the DVR. One approach is to ask clients how much video they are currently storing, and to tailor the DVR’s storage size to meet their current storage plan.
An important variable in calculating video storage requirements is the stored picture quality. Higher resolution images, for example 640 x 480, require more disk space per image than lower resolution values such as 320 x 240.
Another element in figuring the storage requirements is the frames per second to be stored. One recommendation is to start at a minimum of 2-3 frames per second for each camera recorded, and review the performance of the DVR’s playback after the client has become used to working with the system.
After considering the frames per second and picture quality issues, check with the selected DVR’s manufacturer to help calculate the disk drive requirement for a particular installation, taking into account the number of cameras and days of storage that your client desires.
Many DVRs provide the capability to ramp up the frames per second rate of video recording after motion is detected, or an external device has triggered a specific alarm input on the DVR.
What can cause one or more of the connected cameras to not display on the DVR’s monitor output?
Looking for quick answers on security topics? Try Ask SDM, our new smart AI search tool. Ask SDM →
Theoretically, the replacement of a CCTV system’s VHS timelapse tape recorder with a DVR should be a plug-and-play process, simply substituting digital recording technology for analog. Problems often arise when a DVR is connected to existing CCTV video feeds, as DVRs are much less forgiving of poor video signal quality than their tape-drive predecessors. DVRs are “signal specific,†and poor connector quality, ground loops, improper cable, or improper cable lengths will render a video feed that might have been usable by a VHS recorder but cannot be processed by a typical DVR.
If a camera doesn’t appear properly on the DVR’s monitor output, switching the input of the suspect camera with that of a camera that is working will show you whether the problem lies in the camera’s video signal or in the DVR itself. Assuming that this test is passed, check over the suspect camera’s installation, looking for some of the problems listed above.
What causes color camera images to appear on the DVR’s display in black-and-white?
There are a number of possible causes of this problem. Poor connectors, improper coax type, poor grounding, and excessive distances can strip the video feed of its color component before it reaches the DVR, leaving black-and-white images. This problem often occurs when integrators have used twisted-pair video transmission systems, which will typically be specified at one maximum distance for black-and-white video, and a much shorter maximum distance for color. Again, this is the sort of problem that might not have appeared when the particular camera was connected to a VHS recorder, but becomes a problem for the DVR installation.
Connector Problems: Poor connectors can be caused by corrosion of connector fittings; improper mechanical fit of the cable and center conductor into the connector body; not properly connecting the braided shield of the cable to the connector; and/or the connector not being tightly twisted onto the camera or monitor. Connector problems can occur at the camera or monitor end, or at any junction or splice point between the two.
Coax Type: CCTV manufacturers typically specify the use of RG-59 coaxial cable, with a 95 percent braided copper shield. Other types of coax may not provide proper performance.
Grounding Issues: A typical problem in DVR installations is a ground differential between a particular camera and monitor. This grounding problem will usually cause horizontal hum bars to appear on the monitor’s screen.
Ground differentials happen when the power supply or transformer connected to a camera is grounded at a different point than where the monitor is electrically grounded. The two grounds are not electrically identical, causing a voltage potential between the two grounding elements. Connecting the affected devices to different electrical outlets may solve the problem. Use of fiber optic transmission sets will definitely eliminate this particular problem.
Cabling Distances: Here are the typical maximum distances for various types of cable that can be used for CCTV cabling from a remote camera to the head-end equipment, such as a DVR:
- Coaxial Cable: 800-1000 ft.
- Twisted Pair Transmitter-Receiver: 2000+ ft. (It’s important to check these distances, as often these manufacturers will list one maximum distance for black-and-white transmission, and a lesser distance for color signals.)
- Fiber Optics: 62.5 or 50 Micron Core Multimode Fiber: 4 miles, 9 Micron Singlemode Fiber: 20-plus miles
Internet Viewing of DVR Images
One of the primary values of DVR installations is their ability to be viewed and controlled over local LAN networks and the Internet. To achieve remote viewing requires connection of the DVR to network cabling, devices, and Internet connections that are usually provided by the client. Security technicians need knowledge of networking, IP addressing, and Internet connections for an installation to proceed smoothly. Having and properly using specific testing equipment can save many hours of frustration on the job site.Industry experts strongly recommend that system integrators solicit the assistance of their client’s IT personnel very early in the process of planning and installing a DVR. A functional knowledge of networking is also very important to help the security technician communicate with IT personnel.
What testing equipment is needed for Internet connections?
The primary testing tool for connecting DVRs to the Internet is a laptop computer with a wired Ethernet port. This computer should be loaded with Windows operating system software, and any specific software provided by the DVR vendor to allow communication and viewing of the DVR’s images. This computer also should be capable of Internet communications through its Ethernet port.
Along with the computer, always carry two Ethernet communication cables, one a straight-through and the other a cross-over cable, which is used to connect the laptop directly to the DVR without going through any network hubs or switches.
A low-cost Ethernet tester can be essential in testing RJ-45 jacks for their viability in connecting to the network. A typical tester, such as the Byte Brothers TVR 10/100, costs less than $200 and can save hours of fruitless labor by verifying the presence of Ethernet communications at a particular jack location. (Information on this tester is available at www.bytebrothers.com.)
What are the proper steps for achieving Internet communications?
1. Pre-test the DVR and laptop. Before going to the job site, connect the DVR to a single camera and the laptop computer that will be used at the installation. Use a cross-over Ethernet cable between the computer and the DVR. Turn on the DVR, and use the laptop to view the camera’s image. This step will acquaint the technician with the passwords necessary to access the DVR, as well as verifying that the images can be viewed over a LAN network, which is represented by the laptop. If a broadband connection – such as a cable modem or DSL service – is available, then the DVR can be programmed to communicate over the Internet from the integrator’s office, allowing the technician to practice the steps necessary to achieve Internet communications.
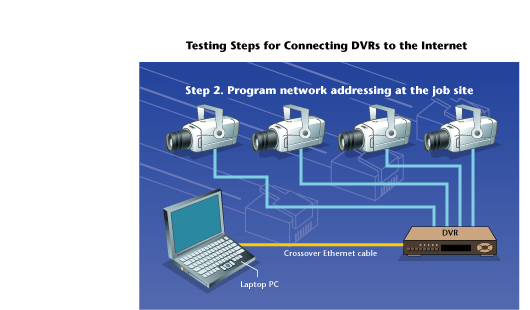
2. Establish local network settings. After the DVR has been installed at the client’s location and connected to the cameras, reconnect the laptop computer to the DVR, using the cross-over cable. Establish communications with the DVR, and program the proper LAN IP address, subnet mask, gateway router, and port number into the DVR. If you are connecting the DVR to the client’s LAN network, this addressing information should be obtained from the client’s IT manager. Once this information is programmed, use the laptop to verify that the DVR communicates over the LAN network. The technician may have to reprogram the IP address of the laptop to allow laptop-to-DVR communications.
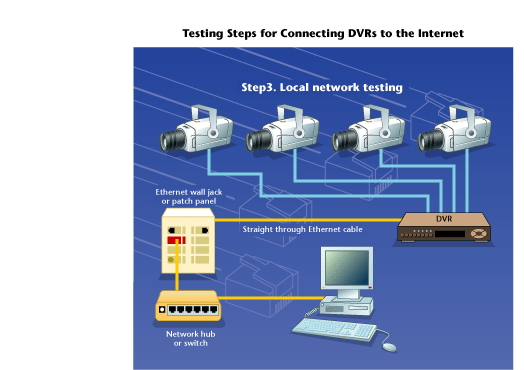
3. Perform local network testing. If the DVR communicates with the laptop computer, disconnect the laptop and connect the DVR into the client’s network using a straight-through jumper cable. Go to another PC on the network, disable any software firewall programs, open a web browser, and type in the DVR’s LAN IP address. If everything is working properly, then the DVR’s sign-on screen should appear and video images should be viewable from the local network PC.
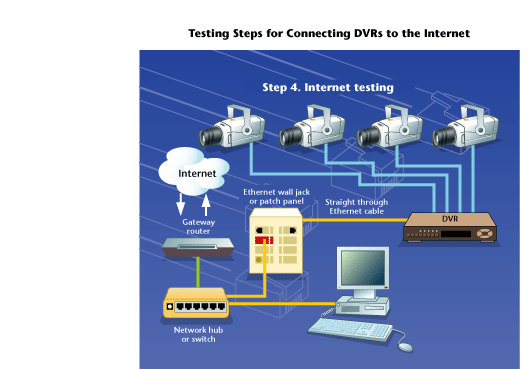
4. Connect to the Internet and test. If the addressing issues in step 2 have been properly inputted, and the client’s network is connected to an ISP, connecting the DVR onto the client’s network should allow viewing of the DVR over the Internet. This can be tested from a remote PC connected to the Internet, or by using the same Internet connection to which the DVR is attached.
5. Troubleshoot, if necessary. Unfortunately, there can be many obstacles to viewing an installed DVR over the Internet. Some of the stumbling blocks include improper IP addressing, blocked ports in routers and gateways, Virtual Private Network (VPN) and proxy server issues, and hardware firewalls blocking transmissions. Often more than one of these problems is present at a particular installation, which can cause great difficulty in diagnosing the problems and their solutions.
Acknowledgements
SDM acknowledges the following individuals for contributing their expertise to this article: Vince Veneziale, manufacturers’ representative for Monfort Electronics; and Gary Perlin, vice president of Speco Technologies, Amityville, N.Y.Looking for a reprint of this article?
From high-res PDFs to custom plaques, order your copy today!